Replacing drum brakes might sound like a complicated job, but it is not if you have the right skill sets and follow the right procedure. Follow these tips if you're looking for how to increase from brakes on your car:
⚠️ If It's Broken, Don't Fix It - Get Paid Cash for Your Vehicle ⚠️

- Prepare all necessary equipment & get your vehicle ready
- Take out the brake shoes
- Install the new drums and brake shoes
- Install the drums and replace the wheels if needed
- Give your vehicle a quick test drive
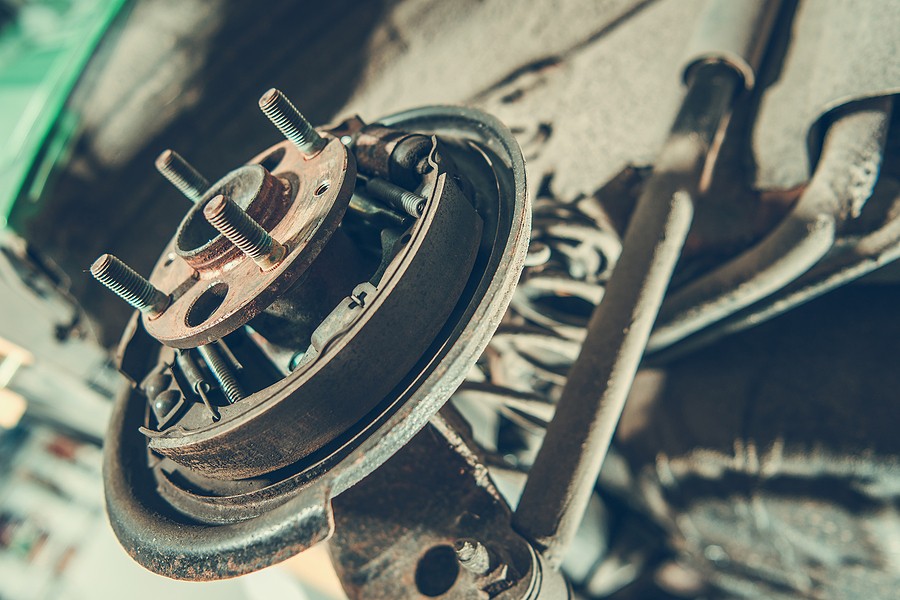
There are specific elements in your vehicle that must be in good condition all the time, especially those related to your safety. For example, it is impossible to drive a vehicle that has an improper or malfunctioning braking system. Therefore, you must inspect and perform necessary maintenance to your braking system all the time.
Over time of use, the braking system is expected to fail, and there will be a point of time we have to replace certain components. So, for instance, if you were driving a car with drum brakes, you might have to replace these drum brakes at some point.
The good news is that replacing the drum brakes is not a complicated job, but it requires certain toolsets and specific steps to prevent safety issues. This article provides you with a step-by-step overview of replacing drum brakes and highlights all necessary tools that you must prepare to finish the job without needing a mechanic.
What are drum brakes, and how are they different from disc brakes?
Before we dig into the details about replacing drum brakes, it is essential to understand what the drum brake in the first place is and how different it is from the other common types of brakes, which is the disc brake.

1- Drum brakes
Typically, the drum brake, as the name suggests, is a huge drum that consists of two important pieces. The first piece is the outer piece, which rotates with the wheels and interfaces that get in touch with the inner piece. On the other hand, the inner peace does not move and is the stationary component that is linked to your braking power. Therefore, whenever you hit the brakes, the inner peace expands and gets in touch with the outer piece forcing the wheels to gradually small until you achieve a final stop.
Drum brakes are common in older vehicles, and you most likely won't see this type of brakes starting from the early 70s onward because most vehicles switch to using the other type of brakes, which has the disc brakes.
2- Disc brakes
On the other hand, Disc brakes consist of a main disc or a rotor that spins with the wheel and Brake pads to replace the inner drum peace, which is the stationary component that forces the disc to stop spinning gradually until your vehicle completely stops.
Brake pads are not directly linked to the brake rotor; instead, they are fitted inside a specific caliper fitted around the disk, and whenever you hit the brakes, the caliper squeezes until the brake pads touch the disc and force the wheels to stop.
Replacing drum brakes: how to replace drum brakes on your car?
Replacing the brakes sounds like a dangerous job that requires a specific level of mechanical skillsets. While this is true, it doesn't necessarily mean that you can't replace your brakes if you follow the right procedure.
This step-by-step procedure will highlight how to replace drum brakes on your car without needing a professional:
1- Prepare all necessary equipment
Before you move any step further in replacing the drum brakes, it is critical that you have all the necessary equipment handy and prepared to make the process more complicated and time-consuming.
Typically, to replace the drum brakes, you will need the following tools:
- Safety glasses
- Protective gloves
- Repair manuals
- Drum brake toolkit
- Tire chocks
- Ratchet and socket
- Oil drain pan
- Needle nose pliers
- Jack Stanton Jack
- Dust mask
- Drum brake
- Drum brake adjustment tool
- A micrometer
- Brake shoes
- Aerosol brake cleaner
2- Select your working station
When replacing drum brakes, you'll have to deal with some brake dust that might be hazardous and can be extremely critical if you have some respiratory problems here; therefore, one of the first steps in replacing the brakes is to select the right area that is fully ventilated what you can work comfortably without impacting other people.
3- Use the designated tools to loosen the lug nuts
The first step in replacing drum brakes is to use the right tools to loosen the vehicle's lug nuts. Keep in mind that experts recommend loosening the lug nuts when the car is not raised yet because the heavier the vehicle, the easier it is to loosen the nuts. To loosen the nuts, you'll have to remove any caps that might be covering these nuts, which depends heavily on your vehicle's design.
4- Raise the vehicle using a jack and jack stands
After loosening the knots, the next step is to raise the vehicle using a Jack and Jack stand. Keep in mind that raising the car requires specific steps, which means that you must review how to raise your vehicle sitting without causing any hazardous issues that might impact you.
It's not surprising that you'll have to raise the car because you cannot rely on the parking brakes since you'll be working with the rear portion of the vehicle.
5- Take out the brake shoes
Once the vehicle is completely raised and secured, the next step is to remove the brake shoes. Again, you must know where these brake shoes are located and how they look by following the information in your vehicle's owner’s manual.
To get access to the brake shoes, you'll have first to remove the wheels. As you remove the wheels, keep in mind that expect to see some brake dust that might impact your safety and be considered hazardous. Therefore, you must work in a ventilated area and have safety goggles and gloves.
You can easily remove the brake drums by juggling them back and forth without needing any tool. However, if you seem like the drum is not moving along, you'll have to apply a little more force.
Depending on your vehicle's type, the drums might be secured by specific screws, which means that you will need to take a closer look at how the drum is connected so you can remove it safely without putting too much pressure and breaking the other components.
6- Apply drum brake cleaner
After removing the drums, you'll have to apply a specific drum brake cleaner around the entire area of your braking assembly. Again, you must place an oil pan underneath the brakes because there's a very high chance that some brake cleaner might get on the floor, which can be a little bit harmful to the environment.
As you're working on replacing drum brakes, you must take some pictures of how things were connected so you can have better guidance on how to put it back.
7- Perform a quick brake inspection
One of the best tips that we would like to give you here is that before installing the new brakes, you must look at the baking system and ensure that it's in good condition. For example, you'll have to inspect the following elements:
· Brake fluids
Brake fluid must be at the optimum level, and there shouldn't be any signs of internal or external leaks. If that's the case, you'll have to rely on certain equipment to take care of these leaks or consult your mechanic if leaks are measured. However, if leaks are extremely major, you should see other symptoms that bring your attention before even attempting to replace the drum brakes.
· Brake drums
Look at the drums and see if there are any signs of damages or other rust that could impact the overall functioning of the braking system.
· Brake shoes
When replacing the drum brakes, many drivers replace the brake shoes as well at the same time since you spend the time raising the car and accessing the location of the drum brakes. However, if you feel that the brake shoes are in good condition using a micrometer, you don't necessarily have to replace them.
8- Take out the brake drum components
Once you perform the full inspection, you'll have an idea about what needs to be replaced exactly by a vendor placing the entire components. At this point, you can go ahead and take out the brake shoes, and they assemble the drum brakes.
9- Disconnect the parking brake cable
As part of replacing drum brakes, you'll also have to remove the parking brake cable retainer d sometimes; you have to replace this clip if it's not in good condition.
10- Install the new drums and brake shoes
Once everything is disconnected, you can go ahead and install the new drum and brake shoe. Keep in mind that it's a great idea to compare the old components to the new ones to ensure that you bought the right ones. Also, before installing these elements, experts recommend applying some lubrication material to help clean the area before installing the components.
11- Reconnect the parking brake retainer clip
Once you install the braking shoes and the drums securely, the next step is to reconnect the brake retaining clip and adjust the screw assembly.
12- Ensure that the brake shoes are connected securely
13- Reconnect the tensioning spring, and they hold down pins
14- Confirm that the return springs are connected securely
15- Optimize the brakes to allow the best expansion
Since the brake shoes will impact how you stop the vehicle by interacting with the drum, it is important to ensure that the brake shoes are adjusted securely and carefully to ensure the right expansion, as indicated in your vehicle's owner’s manual.
16- Install the drums and replace the wheels if needed
Once the brake shoe is connected securely, you can go ahead and install the new drums. Follow the recommendations on your manual about how the drum should sit over the brake shoes.
17- Perform a final brake shoe optimization
Once installing the drum, you'll have to read, look at the brake shoes and re-optimize them to adjust and ensure that they are interacting with the drums correctly.
18- Reconnected the wheels and the tires
19- Put your vehicle down
20- Take out the wheel chocks
21- Replace the drum brakes on the other axles by following the same mentioned steps
22- Tighten the lug nuts
23- Give your vehicle a quick test drive
Conclusion
Your vehicle's brakes are one of the most critical components that have to do with your safety. Without having the right brakes, you deal with significant hazardous situations that impact your life and the lives of other people driving around you.
If you're driving an older car equipped with a drum brake, this article provided you with a sub by step procedure on how to replace these brakes without needing a professional so you can save on labor costs.
Keep in mind that while it's not very complicated to replace the drum brakes, you might need to consult a mechanic to achieve the best results if you are not comfortable replacing your brakes. Also, if your car has other major problems, it might not be worth the investment replacing the brakes, and instead, you might want to consider selling your vehicle and using its money towards a better car.
Cash Cars Buyer is willing to remove your vehicle within one to three days only! Cash Cars Buyer is one of the top-rated car removal companies in the nation that guarantees to pay you the top dollars and provide you with free towing despite your living location around the United States.
Our process is very straightforward and doesn't take more than a couple of days to get your car removed safely and for the most money.
All it takes you is to:
- Describe your car’s type and condition
- Receive our instant free quote
- Accept the quote
- Get your car removed and receive your cash payment on the spot!
To learn more about our process and our teen, you can reach out to us by giving us a call at 866-924-4608 or visit our home page click on the free instant online offer.