If your head gasket fails in such a fashion that the fuel/air combination escapes, then the compression of that cylinder is now reduced. This loss of compression will result in a rough running engine. Typically, this failure is accompanied by a sound that is similar to an exhaust leak.
⚠️ If It's Broken, Don't Fix It - Get Paid Cash for Your Vehicle ⚠️

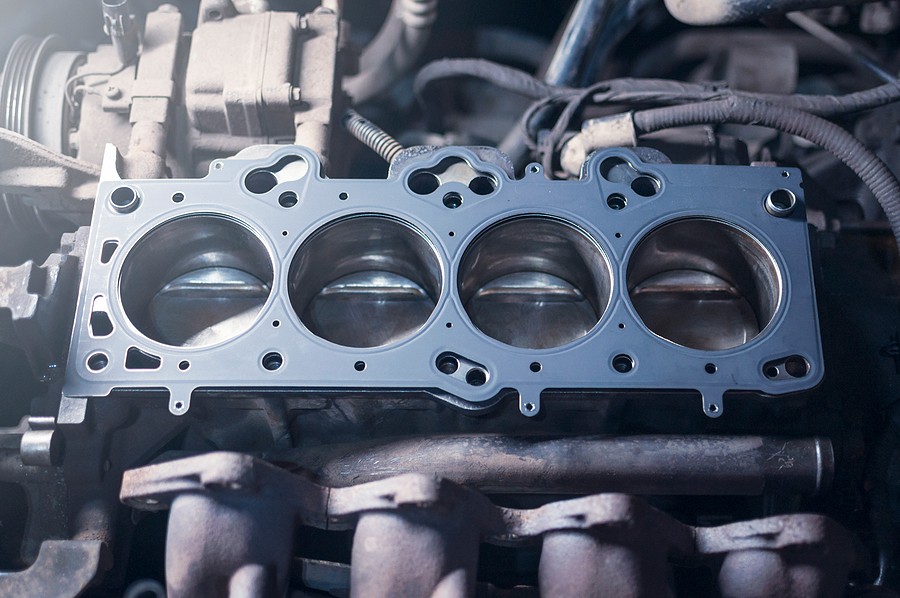
What is a Head Gasket and What Does it Do?
Many modern vehicles are generally manufactured with an engine block as well as a cylinder head – which are bolted on the top. This arrangement makes a head gasket a critical component for a car. Your head gasket is situated between the cylinder head and the engine block and cylinder head. It also features a design of cylindrical bored holes – which are able to host the vehicle’s pistons.
A head gasket operates as a seal between the cylinder head and the engine block. Additionally, your head gasket should be able to maintain that much-needed seal, so that leakage between the engine block and cylinder head never happen. To put in in a simpler way, your head gasket is the sealing of the cylinders ensuring the most compression is achieved. A vehicle’s head gasket is also exposed to elements such as fuel, water, oil and even exhaust gases.

The head gasket houses the compression ratio in the combustion chamber of your vehicle. The head gasket also has the task of separating the passage of water and oil through the cylinder head and block of the engine. Typically, a blown head gasket is caused by a vehicle overheating. This generally occurs, once the engine coolant reaches a temperature whereas the pressure is constructed to the same degree, once the metal of the engine begins to expand. In lots of cases, the oil and water will mix, thus causing tremendous damage to the engine.
How Do I Repair a Leaky Head Gasket?
Check out the general steps needed to repair a leaky head gasket:
- You first want to disconnect the battery and begin the drain your cooling system.
- Next, you want to remove all components and items that are directly attached to the intake manifold. Before removal, don’t forget to identify and label each component position, so you can replace the components with ease.
- Once you have disconnected the exhaust manifold from the cylinder head, you can then remove the front engine cover as well as the timing chain or belt. This is especially helpful for car owners that have OHC engines.
- Then, take the time to label and indicate the timing marks for the chain or belt for proper installation.
- Don’t forget to ensure that your valve cover is removed from the cylinder head. Should the engine be one that is a pushrod type, take the time to remove or loosen the rocker arms, followed by removal of the pushrods. After the head bolts have all been removed, you can now discard them and replace them with new bolts, if they require TTY or torque-to-yield bolts.
- After you’ve made sure that all bolts have been removed, carefully detach the cylinder head from the engine.
- Next, you want to clean and inspect the connecting surfaces of the engine and the cylinder head.
- If you have deck or head surfaces that are not smooth, you can take them to a machine shop for resurfacing.
- You can use an aerosol gasket remover as well as a scraper to clean the surfaces of the block and the head.
- Now, you want to ensure that the new head gasket is properly fitted to the engine block deck.
- Be sure that the correct side is facing upward.
- Now, you want to secure all openings and hole are in line with the head and the block. Once complete. Only then can you replace the cylinder head on the block.
Additional Information You Need
Head bolts are tightened as well as fastened in a designated sequence, with a determined torque value. An angle gauge and a torque wrench are used when fastening TTY head bolts. This is a very important task and has to be correctly executed so that the head gasket is affixed in the proper fashion.
With this precise method-the valve cover, front engine cover, timing belt/chain and the engine of the valve-train’s components, timing chain or belt, valve cover can all be re-inserted. You want to reconnect all wiring and plumbing too. With your torque wrench you can tighten all fasteners as directed.
Now comes the time to adjust and check the valve-lash as well as the chain alignment or the timing belt You can now refill the cooling system as well as re-connect the battery.
What Else Should I Replace When Replacing A Head Gasket?
Other items will likely need replacement, in addition to your head gasket. Some of those components may include:
- Coolant
- Oil
- Oil filter
- Spark plugs
- hoses
- Cylinder head bolts and more.
TTY or Torque-to-yield (TTY) head bolts that are utilized on various late-model engines are bolts that are of a one-time use. So, do not reuse them as your increase in damage and breakage increases. Should the head set not include new TTY head bolts, you may want to obtain some. Many late-model engines have MLS or Multi-Layer Steel (MLS) head gaskets. These kinds of gaskets generally have three to five layers of steel that are covered with a soft coating on the outside. MLS gaskets are also far more durable than other kinds of head gaskets- usually lasting a for a long period of time. But you want to keep in mind that they are NOT reusable- even if they look as if they are in good condition.
Is it Worth it TO Fix a Blown Head Gasket Making A Sound?
You do indeed want to fix your blown head gasket that is making that exhaust leak sound. But if you have a very old car, then replacement of the head gasket may not be a repair that you see as worthwhile. You may opt to get a few quotes and then compare the costs. Should the head gasket repair be worth more than the car, then you may want to sell the car for fast cash. With all of this in mind, the average cost for repair of a blown head gasket repair can range anywhere between $1,000 to $2,000. Some blown head gasket repairs can cost as much as $2,500.
How Can I cool And Avoid A Blown Head Gasket?
Check out these steps to avoid a blown head gasket:
Check Your Coolant Levels
Many vehicle manufacturers have made it quite easy for car owns to check the coolant level in a car. Simply open the hood of your vehicle and look at the coolant reservoir. Is it at the “full” line? Then you’re good. If it’s not, then you want to carefully top it off with a compatible coolant. Should your coolant level be low in your radiator tank -but full in your overflow tank- then you may have to take your car to a mechanic for a proper diagnosis.
Test Your Coolant’s Condition
Many engine systems are crafted for a 50/50 combination inhibited glycol and water. Should that combination be unbalanced, then the temperature will be raised in your engine- causing overheating. Your coolant will also begin to boil off. Once the coolant level gets too low, air pockets will begin to form in the cooling system. This can cause a reduction in the effectiveness proper cooling and temperatures of your vehicle. Once this happens, the cylinder head gasket may now be compromised. So, you want to test the mixture ratio of your coolant. Grab a handheld antifreeze tester. Next, you can use your tool to draw a small amount of coolant and place it on a test chamber that has a floating gauge. You want to test your coolant mixture when the engine is COLD … not HOT. Additionally, you never want to open the pressure cap when the engine is hot. You can also check your upper radiator hose if you have doubts. IS the hose too hot to the touch? Or is it hard to squeeze? Then do not open the radiator cap. After you’ve determined that the cooling system isn’t under any pressure, you can now remove the pressure cap- and proceed with testing your coolant that’s located in the expansion coolant reservoir. Take the time to read the directions on your tester for the most accurate instructions. Your tester will assist you in making any visual observation on your coolant’s condition. Now that you know the makeup of your coolant, you can add as necessary.
Coolant Flush
Flushing the cooling system helps to remove any debris or junk that may be impeding or blocking the flow of coolant through the vehicle’s system. A coolant flush also helps to refresh the additives that help to prevent corrosion. Your coolant flush will further protect vital cooling system components such as the radiator, heater core, thermostat, water pump and more.